Windows 10 Show recently opened items in Jump Lists on Start or the taskbar and in File Explorer Quick Access - OFF settings registry
Start > Windows Settings > Personalization > Start
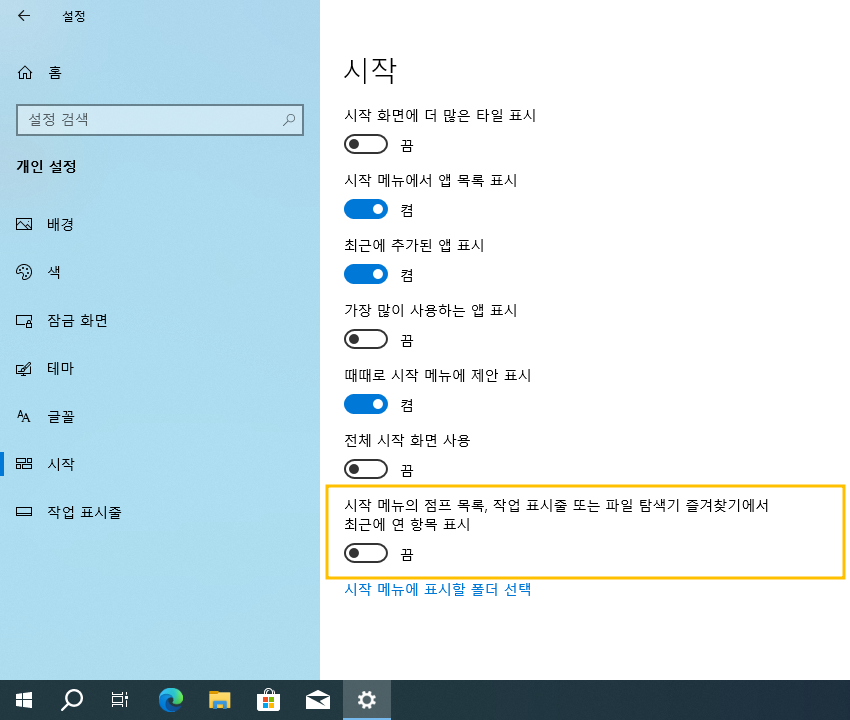
윈도우10 시작 메뉴의 점프 목록, 작업 표시줄 또는 파일 탐색기 즐겨찾기에서 최근에 연 항목 표시 - 끔 설정 레지스트리
시작 > Windows 설정 > 개인설정 > 시작
영상보기 : https://youtu.be/dtNdG3Yxew4
이 명령은 Windows 레지스트리에 Start_TrackDocs 값을 추가하여 최근에 열었던 문서의 기록을 추적하지 않도록 비활성화하는 설정을 적용합니다.
www.youtube.com/@XTRM
소프트엑스 XTRM
SOFTware unknown X of XTRM 컴퓨터 유지보수 기술 공유 채널입니다.
출처: https://xtrm.tistory.com/392 [XTRM MEDIA SERVER:티스토리]
※ 티스토리 페이지 비밀번호는 유튜브 영상 "...더보기" 설명란에 있습니다.
Windows 10에서 점프 목록에서 '최근 항목' 및 '자주 사용하는 위치'를 켜거나 끄는 방법
최근 항목 은 최근에 사용하거나 연 파일 목록입니다. 이러한 항목은 빠른 실행에서 "최근 파일"로 표시되고 시작 메뉴 및 작업 표시줄의 점프 목록에서 "최근" 아래에 표시됩니다.
자주 사용하는 위치는 최근에 연 폴더, 웹사이트 등의 목록입니다. 이러한 항목은 빠른 실행 폴더에서 "자주 사용하는 폴더"로 표시되고 파일 탐색기에서 파일 아래에 "자주 사용하는 위치"로 표시되고 시작 메뉴 및 작업 표시줄의 점프 목록에서 "자주 사용하는 항목" 및 "최근" 아래에 표시됩니다. 이 자습서에서는 Windows 10에서 계정 또는 특정 사용자나 모든 사용자에 대해 파일 탐색기, 빠른 실행, 점프 목록, 시작 메뉴 및 작업 표시줄에서 최근 항목 과 자주 사용하는 위치를 저장하고 표시하는 것을 켜거나 끄는.
최근 항목과 자주 사용하는 장소를 끄면 빠른 액세스에 고정 하고 점프 목록에 고정한 위치 를 제외한 모든 항목이 재설정되고 지워집니다 .
최근 항목과 자주 사용하는 장소는 아래 폴더 위치에 저장됩니다.
%APPDATA%\Microsoft\Windows\Recent Items
%APPDATA%\Microsoft\Windows\Recent\AutomaticDestinations
%APPDATA%\Microsoft\Windows\Recent\CustomDestinations
옵션 1: 설정 앱에서 현재 사용자에 대한 "최근 항목" 및 "자주 방문하는 장소" 켜기 또는 끄기
옵션 2: REG 파일을 사용하여 현재 사용자에 대한 "최근 항목" 및 "자주 방문하는 장소" 켜기 또는 끄기
옵션 3: 로컬 그룹 정책 편집기에서 특정 사용자에 대한 "최근 항목" 및 "자주 방문하는 장소" 활성화 또는 비활성화
옵션 4: REG 파일을 사용하여 모든 사용자에 대해 "최근 항목" 및 "자주 방문하는 장소" 활성화 또는 비활성화
OPTION ONE
Turn On or Off "Recent Items" and "Frequent Places" for Current User in Settings app
1 Do step 2 or step 3 below for how you would like to open Personalization in the Settings app.
2 Right click or press and hold on your desktop, click/tap on Personalize, and go to step 4 below.
3 Open Settings, click/tap on the Personalization icon, and go to step 4 below.
4 Click/tap on Start on the left side. Turn on (default) or off to Show recently opened items in Jump Lists on Start or the taskbar and in File Explorer Quick Access for what you want.
5 When finished, you can close Settings if you like.
OPTION TWO
Turn On or Off "Recent Items" and "Frequent Places" for Current User using a REG file
The downloadable .reg files below will modify the DWORD in the registry key below.
HKEY_CURRENT_USER\Software\Microsoft\Windows\CurrentVersion\Explorer\Advanced
Start_TrackDocs DWORD
0 = Turn off
1 = Turn on
OPTION THREE
Enable or Disable "Recent Items" and "Frequent Places" for Specific Users in Local Group Policy Editor
If disabled, this option will override and gray out Option One, and override Option Two.
The Local Group Policy Editor is only available in the Windows 10 Pro, Enterprise, and Education editions.
All editions can use Option Four below.
1 Open the all users, specific users or groups, or all users except administrators Local Group Policy Editor for how you want this policy applied.
2 In the left pane of the Local Group Policy Editor, click/tap on to expand User Configuration, Administrative Templates, and Start Menu and Taskbar.
3 In the right pane of Start Menu and Taskbar, double click/tap on the Do not keep history of recently opened documents policy to edit it.
4 Do step 5 (enable) or step 6 (disable) below for what you would like to do.
5. To Enable "Recent Items" and "Frequent Places"
A) Select (dot) either Not Configured or Disabled, click/tap on OK, and go to step 7 below.
Not Configured is the default setting.
6. To Disable "Recent Items" and "Frequent Places"
A) Select (dot) Enabled, click/tap on OK, and go to step 7 below.
7 When finished, you can close the Local Group Policy Editor if you like.
OPTION FOUR
Enable or Disable "Recent Items" and "Frequent Places" for All Users using a REG file
If disabled, this option will override and gray out Option One, and override Option Two.
The downloadable .reg files below will add and modify the DWORD value in the registry keys below.
HKEY_CURRENT_USER\Software\Microsoft\Windows\CurrentVersion\Policies\Explorer
HKEY_LOCAL_MACHINE\SOFTWARE\Microsoft\Windows\CurrentVersion\Policies\Explorer
NoRecentDocsHistory DWORD
(delete) = Enable
1 = Disable
자료 출처 : https://www.tenforums.com
 윈도우10 시작 메뉴에 표시할 폴더 선택 Windows 10 Settings - P...


